

New Canvas Features and Updates for Fall 2026
What's New for 2026!
Several new exciting features and updates are coming to Canvas, Turnitin, and Honorlock for Fall 2026. Check them out!Honorlock Version Update
On September 22, 2026, at 7:00 AM CST, Honorlock will update to the newest version, 11.10.0. This is a critical update regarding course content navigation during assessments.
Upcoming Changes and Required Faculty Action Before September 22
-
Restricted LMS Navigation: When BrowserGuard or Allowed URLs is enabled, the platform will now strictly block student access to all native LMS pages and modules outside the active exam itself.
-
Action Required for Whitelisting: If any of your courses rely on students reaching specific LMS modules, resource pages, or documents mid exam, instructors must explicitly add those specific web addresses to the Allowed URLs section in their Honorlock exam settings prior to September 22nd.
-
Third Party Assessments Unaffected: This update strictly applies to native LMS pages. Third party exams where BrowserGuard activates upon unlocking are not impacted, and direct third party assessment URLs do not need to be added to the allowlist.
Legacy Room Scan Video Incorporated into Workspace Scan Photo Student Workflow
Beginning September 1, the Legacy Room Scan Video option in Honorlock will no longer be selectable in the same location in Settings. Honorlock is incorporating this legacy feature into the Workspace Scan Photo student workflow. Enabling Environment Integrity and Workspace Scan Photo will provide students with the opportunity to choose Room Scan Video at the appropriate point in their workflow. More information for faculty and students is being added to Online@JSU's Honorlock Faculty and Student tutorials, including how to avoid student use of the mobile device option built into the Workspace Scan Photo workflow, and instead encourage use of the legacy Room Scan Video option available within that same workflow.
Updated Tutorials and Resources
- Honorlock Faculty Tutorial in Canvas
- Honorlock Faculty Tutorial (Word Document)
- Honorlock Student Tutorial in Canvas
- Honorlock Student Tutorial (Word Document) - Completing a Workspace Scan without a Mobile Device
The New Accessibility Checker
Canvas includes an accessibility tool that detects common accessibility errors within the course. The Accessibility Checker scans Pages and Assignments. You can use the Accessibility Checker to design the course while considering accessibility attributes.
The Accessibility checker tests against a curated selection of WCAG 2.1 Level A, AA, and AAA success criteria. Rather than a checklist for total level-specific compliance, it focuses on the high-impact rules that most frequently affect users.
Key Notes of Interest
- The accessibility checks do not cover all issues that may occur in complex or interactive content created outside the Rich Content Editor.
- The accessibility checker does not scan external files that have been uploaded into the course. For example Word, PDF, and PPT files are not scanned.
Using the New Accessibility Checker
When enabled, an "Accessibility" link appears in the course navigation menu. Clicking on this link loads the Canvas Accessibility Dashboard. Click on "Scan" to scan the course. The course scans native Canvas course elements for accessibility, such as Pages, Assignments, Announcements, Canvas Syllabus, and Discussions Topics.
The dashboard populates upon completion of the course scan.
- Issue status [1]
- Issues by type [2]
- Resources scanned – itemized list [3]
- Fix button [4] click on the Fix button to open the remediation panel
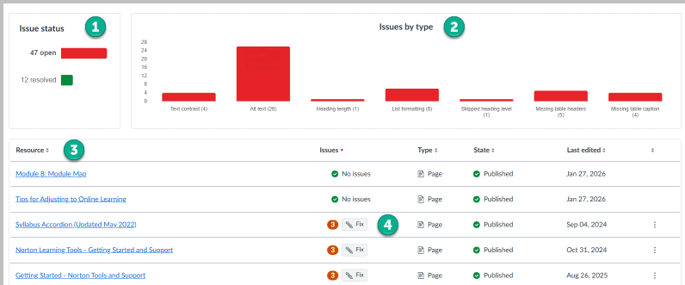
Click on the "Fix" button to launch the remediation panel.
IgniteAI Accessibility Remediation
IgniteAI Accessibility Remediation is embedded within the remediation panel of the new accessibility checker.
IgniteAI Accessibility Remediation can be used to:
- Generate alt text for images (optional)
- Generate captions for tables (optional)
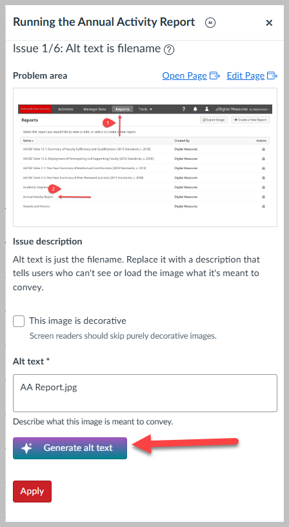
Resources and Nutrition Facts
- New Accessibility Checker and IgniteAI Accessibility Remediation for Courses Product Blog
- How do I use the (New) Accessibility Checker in Canvas?
- Nutrition Fact Sheet – Course Accessibility – Image Alt Text Generation
- Nutrition Fact Sheet - Course Accessibility – Table Caption Generation
What is Canvas Portfolio?
Canvas Portfolio is a built-in Canvas tool that allows students to collect, organize, and present their work over time. Portfolios can support learning, assessment, and career readiness all within Canvas.
Portfolio Types
Evaluation Portfolio
Designed for coursework and assessment. Instructors can assign portfolios, provide feedback, and evaluate student work using Canvas tools like SpeedGrader and rubrics.
Showcase Portfolio
Designed for sharing accomplishments beyond the classroom. Students choose the work they want to highlight and can share their portfolio with employers, graduate schools, or other audiences.
Why Use Canvas Portfolio?
Canvas Portfolio gives students a place to:
- Document learning across multiple courses
- Reflect on their growth and progress
- Showcase projects, research, and accomplishments
- Build a professional portfolio for future opportunities
Faculty Ideas
Consider using Canvas Portfolio for:
- Capstone or senior projects
- Clinical, practicum, or student teaching experiences
- Research or creative work
- Professional development or career preparation
Getting Started
Faculty can create Evaluation Portfolios as graded assignments, while students can create Showcase Portfolios to highlight their best work and share it outside the classroom.
Resources:
Introducing Canvas Portfolio: Now Part of the Core Canvas Experience
Canvas Portfolio Unlocked: New Tool – New Training Opportunities!
Bye, Bye, Classic Quizzes. Welcome, New Quizzes!
Classic Quizzes will be deprecated at the conclusion of the Fall 2026 term. Beginning in Spring 2027, faculty will use New Quizzes as Classic Quizzes will no longer be available.
Faculty will not lose access to any of their Classic Quizzes or Classic Quiz Question Banks; they can be converted to New Quizzes. During the Fall 2026 term, Online@JSU will offer several online workshops at various times to help you learn more about New Quizzes, how to migrate your Classic Quiz content to New Quizzes content, and how to create New Quizzes. Three different sessions are available:
Canvas New Quizzes: An Overview
This one-hour workshop provides faculty with a practical introduction to Canvas's modern assessment engine and the tools needed to build engaging, secure, and effective quizzes and exams. Participants will learn how to create New Quizzes, explore the available question types, organize question banks (item banks), configure quiz settings, and use features such as accommodations, moderation, and multiple attempts.
- Available Session Dates:
Canvas New Quizzes: Converting Classic Quizzes to New Quizzes
As Canvas transitions away from Classic Quizzes, now is the time to begin migrating your existing assessments to New Quizzes. In this one-hour, hands-on workshop, faculty will learn how to efficiently convert Classic Quizzes to New Quizzes and understand what to expect during the migration process.
- Available Session Dates:
Canvas New Quizzes: Creating a New Quiz and Connecting it to Honorlock
In this one-hour, hands-on workshop, participants will build a New Quiz from start to finish while exploring the essential tools and settings needed to deliver successful online assessments. Faculty will learn how to create a New Quiz, add and manage Item Banks to support question randomization and reuse, configure quiz settings, and connect a quiz to Honorlock for online proctoring.
All sessions will be recorded.What is Canvas Notebook?
This new feature gives learners a built-in way to take notes and highlight key ideas inside Canvas.
Inside any Canvas Page, learners can:
- Highlight passages they want to return to
- Mark material as “important” or “unclear”
- Leave their own notes to return to later
- View all of their notes and highlights for a course in a single Notebook, accessible from the Course navigation
Using Notebook
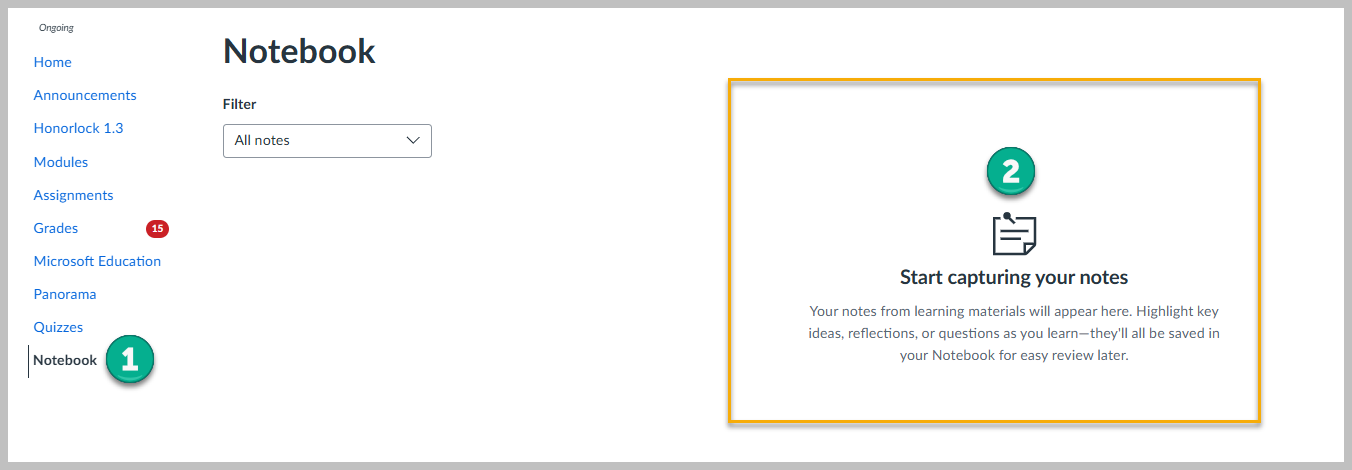
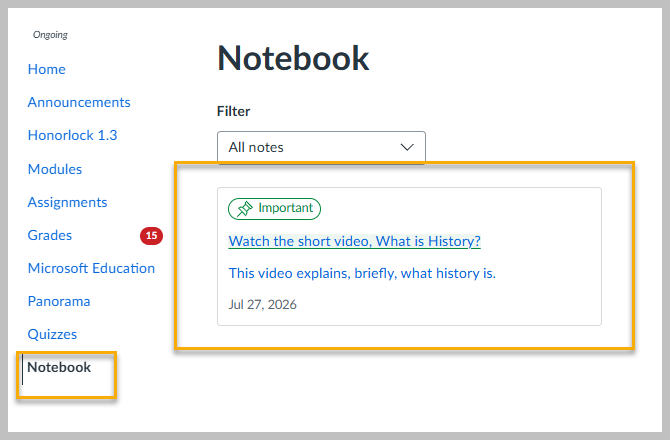
When enabled, a Notebook link [1] appears in the course navigation menu. All notes created by students are collected on the Notebook page [2].
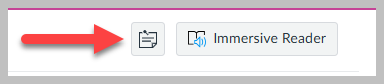
Notes can be created on any Page by opening the Page, and clicking on the Notebook icon.
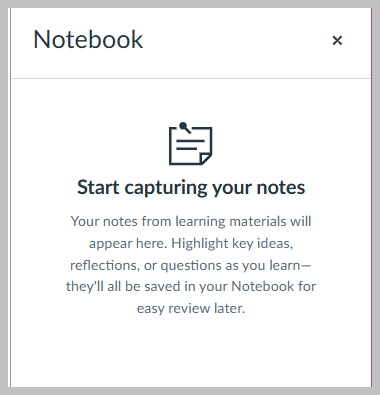
The Notebook panel opens.
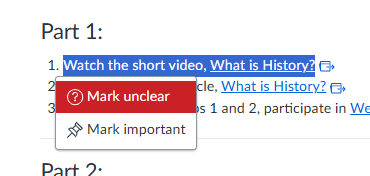
Highlight any text and then choose Mark unclear or Mark important.
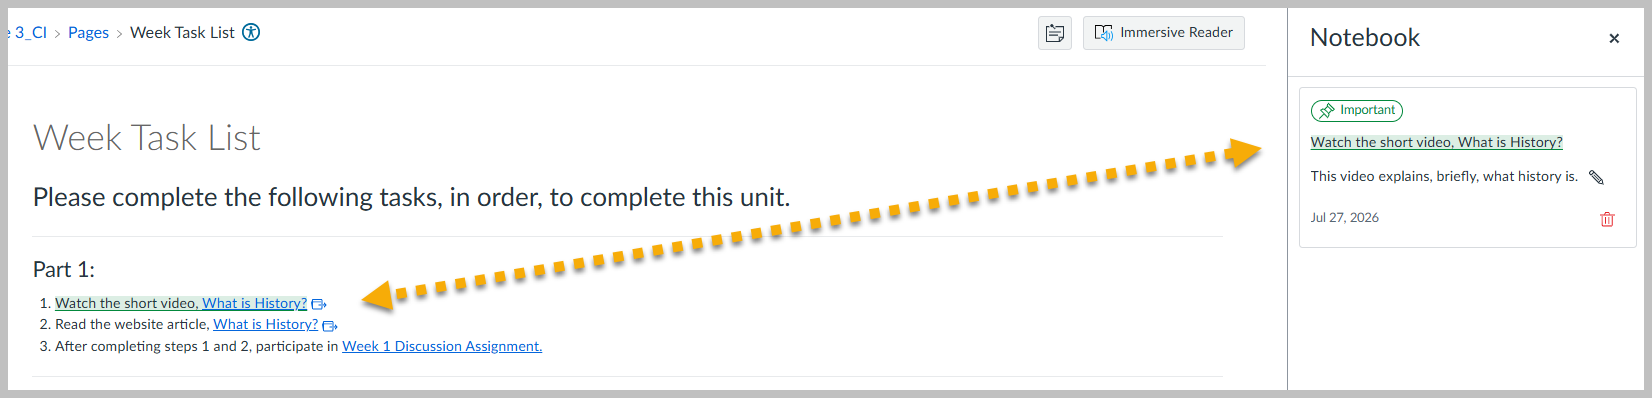
Marked text is highlighted on the Page. It also appears in the Notebook panel. Students can add comments to the marked text.
The new note is added to the Notebook page.
Resources
Canvas Peer Review Assignments Update
Canvas Peer Review Assignments are being updated in two significant ways:
- How peer reviews are allocated
- How they are structured as assignments
A New Allocation Engine
The new allocation engine assigns peer reviews based on actual submissions instead of enrollment status. As long as a student submits before the available-until date, they will be paired. The engine continuously updates, balances workload across the class, and removes the need for instructors to monitor the student pairing process. For unique cases like a student who needs a specific pairing, instructors can add (manual) allocation rules.
Points and Due dates for Peer Reviews
Instructors can set a separate peer review due date, giving students time to receive submissions and complete reviews before a distinct deadline. Points can be assigned to the peer review itself, surfaced in the gradebook and SpeedGrader as a separate item. Instructors decide the grading format: points-based, complete/incomplete, or feedback-only through setting points to 0.
Resources
Canvas Customizable Dashboard
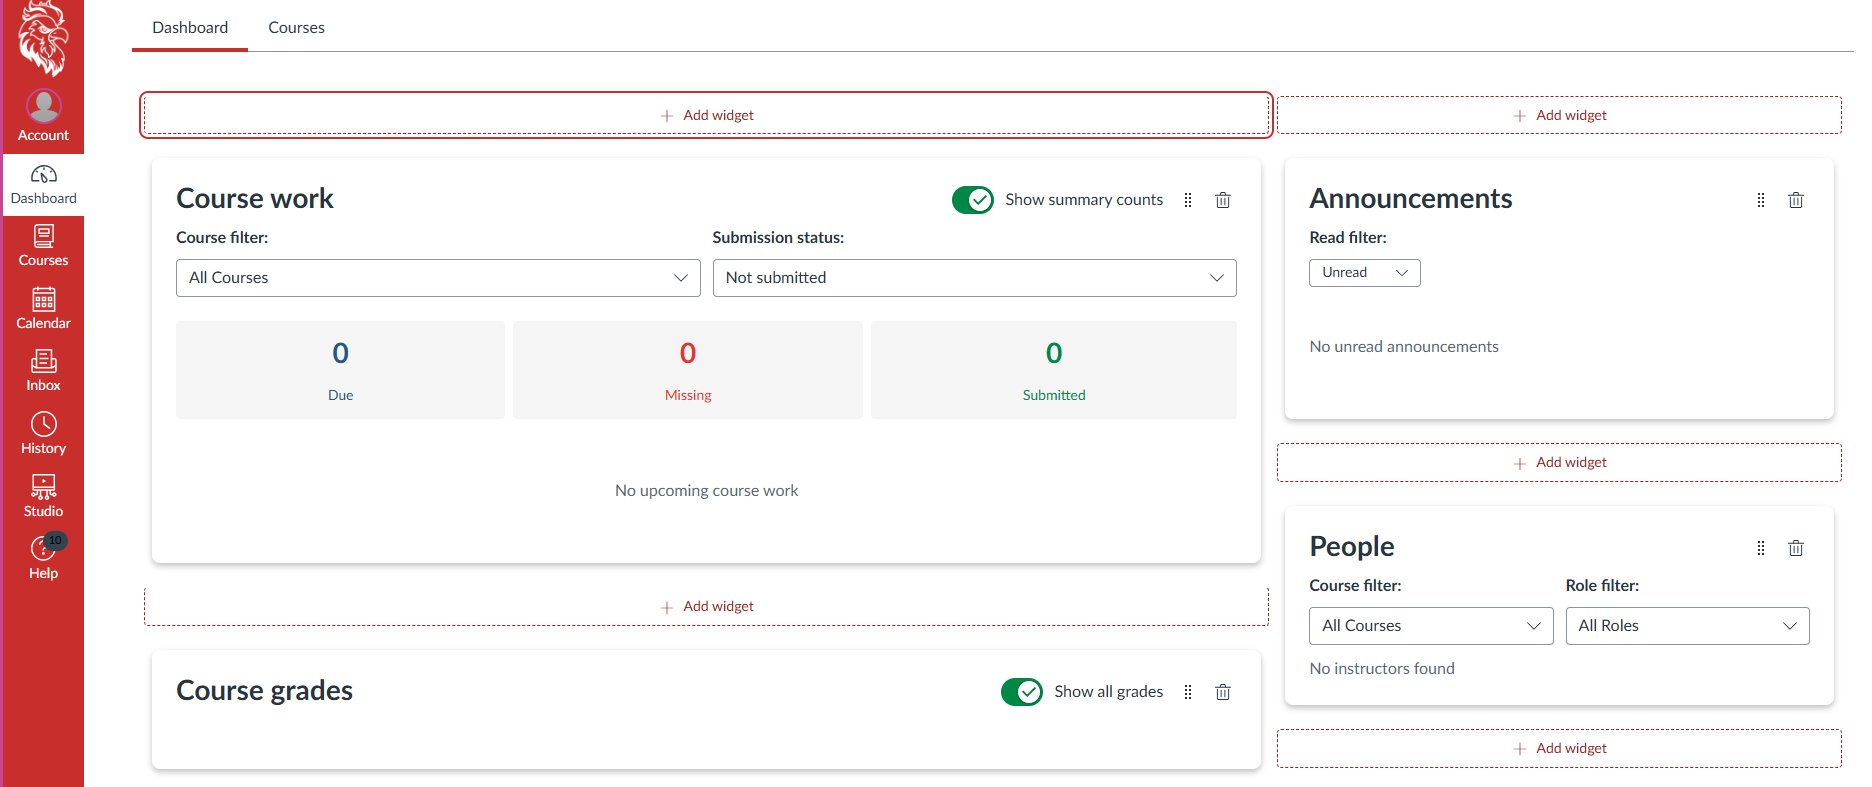
The Canvas Customizable Dashboard gives students more control over how they organize their Canvas homepage. Rather than using the default dashboard layout, students can personalize their view by adding, removing, and rearranging widgets to keep the information they use most front and center. The customizable dashboard is currently a student-only feature.
Whether you're keeping track of upcoming assignments, checking grades, or looking for recent announcements, the customizable dashboard makes it easier to access important course information from one location. Students can also switch back to the classic dashboard at any time.
Key Features
- Course Work Widget – View upcoming, missing, and completed assignments across all courses.
- Course Grades Widget – Monitor your current grades without opening each individual course.
- Announcements Widget – Stay up to date with recent course announcements in one place.
- People Widget – Quickly find instructors and classmates and send Canvas Inbox messages.
- Custom Layout – Rearrange, add, or remove widgets to create a dashboard that works best for you.
How to Customize Your Dashboard
- From the Canvas Dashboard, select Customize Dashboard.

- Choose the widgets you want to display.
- Drag and drop widgets to arrange them in your preferred order.
- Save your changes. You can return at any time to update your layout or switch back to the classic dashboard.
Things to Know
- Your customized layout is unique to your account and does not affect anyone else's dashboard.
- Widgets display information from all of your active Canvas courses, giving you a centralized view of your coursework.
- If you prefer the traditional Canvas experience, you can switch back to the classic dashboard whenever you'd like.
- The customizable dashboard is designed to help you stay organized by bringing assignments, grades, announcements, and course contacts together in one convenient location.
Resources
Canvas Profile Pictures
Your Canvas profile picture is automatically synced with your official Jax State ID card photo. This ensures your profile remains consistent across university systems and helps instructors and classmates easily identify you in Canvas.
When your ID card photo is updated and approved through the university's ID Card Management process, the new photo is automatically shared with Canvas. Because profile pictures are managed centrally, Canvas profile pictures cannot be changed directly within Canvas.
How It Works
- Your official Jax State ID card photo is used as your Canvas profile picture.
- Approved photo updates are automatically synced to Canvas.
- Users cannot upload or replace their Canvas profile picture within Canvas.
How to Update Your Photo
If you would like to use a different profile picture, you must submit a new ID card photo for approval.
- Log in to the MyJaxState Portal.
- Navigate to My Account > ID Card Management.
- Upload your new photo and submit it for approval.
- Once approved, your updated photo will automatically sync to Canvas.
Things to Know
- Your Canvas profile picture is managed by the university and is locked to ensure consistency across university systems.
- Changes made through the ID Card Management portal are not reflected immediately. Please allow time for the approved photo to sync across systems.
IgniteAI Translations for Inbox
With IgniteAI Translations for Inbox, users can compose a new message in Canvas Inbox and translate the text to a different language.
This feature currently supports the following languages:
- Catalan
- Chinese (Simplified)
- Dutch
- English
- French
- German
- Portuguese (Brazil)
- Russian
- Spanish
- Swedish
Key Notes of Interest
- The feature is optional for users to use or not use.
- The original text and translated text both appear.
Using IgniteAI Translations for Inbox
- Click on Inbox in the Canvas Global Navigation Menu.
- Click on the "Compose a new message" icon.
- To include translations in an Inbox message, click the Include translated version of this message toggle on [1]. Select the preferred language [2], then click the Translate button [3]. Choose whether to display the translation first or second [4].
![To include translations in an Inbox message, click the Include translated version of this message toggle on [1]. Select the preferred language [2], then click the Translate button [3]. Choose whether to display the translation first or second [4].](igniteai-translations-for-inbox_2.png)
A Word of Caution
Artificial Intelligence language translation is not perfect, and errors in translation may occur. Users are encouraged to read and revew the translation to confirm the accuracy and veracity of the translation, and edit as needed prior to sending the message to another Canvas user.
Resources & Nutrition Fact Sheet
- How do I translate an Inbox Message using IgniteAI Translations?
- Nutrition Fact Sheet – IgniteAI Translations for Inbox
IgniteAI Translations for Discussions & Announcements
With IgniteAI Translations for Discussions & Announcements, users can translate text in a discussion or announcement into a different language.
This feature currently supports the following languages:
- Catalan
- Chinese (Simplified)
- Dutch
- English
- French
- German
- Portuguese (Brazil)
- Russian
- Spanish
- Swedish
Key Notes of Interest
- Translations are per user; a user can decide whether to use the feature or not. Therefore, the feature is optional.
- IgniteAI Translations for Discussions & Announcements is a course-level feature. Therefore, faculty can disable this feature in a course.
- To disable the feature at the course level:
- Click on Settings [1] in the course navigation menu.
- Click on Feature Options [2].
- Loctate IgniteAI Translations for Discussions & Announcements in the feature list, however over the green checkmark, click on it, and select "disable [3]."
Using Ignite Translations for Discussions & Announcements
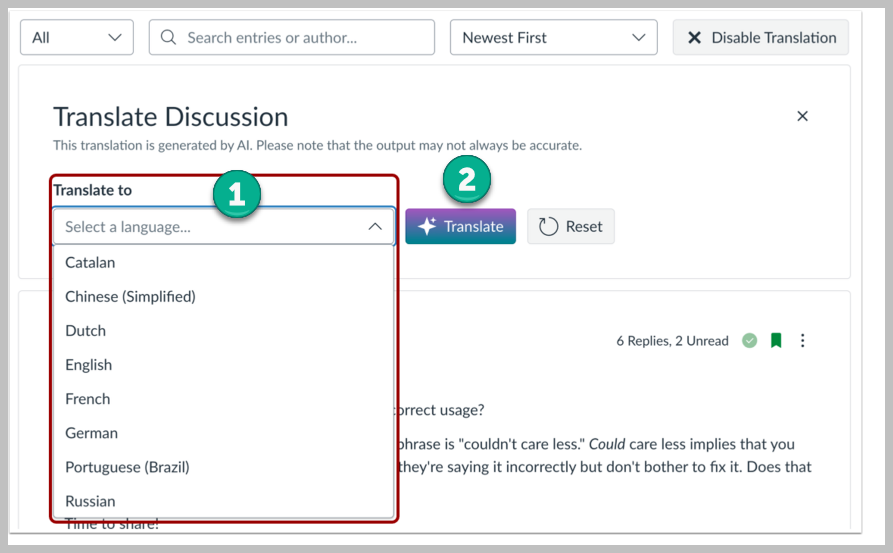
- The “Enable Translation” button is found in the top right corner of the page for both discussions and announcements.

- Click on Enable Translation. Select the language in the Translates to box [1].
- Click on the Translate button [2].
A Word of Caution
Artificial Intelligence language translation is not perfect, and errors in translation may occur. Users are encouraged to read and revew the translation to confirm the accuracy and veracity of the translation, and edit as needed prior to sending the message to another Canvas user.
Translation scans may fail as well.
Resources & Nutrition Fact Sheet
- How do I translate a discussion using IgniteAI Translations as an instructor?
- How do I translate an announcement using IgniteAI Translations as an instructor?
- How do I translate a discussion using IgniteAI Translations as a student?
- How do I translate an announcement using IgniteAI Translations as a student?
- Nutrition Fact Sheet – Ignite AI Translations for Discussions & Announcements
Related Features
IgniteAI Question Authoring for Quizzes
In New Quizzes, you can use IgniteAI Question Authoring for Quizzes to create questions based on course content.
Key Notes of Interest
- Ignite AI Question Authoring for Quizzes is accessed in New Quizzes. It is optional; instructors do not have to use it.
Using IgniteAI Question Authoring for Quizzes
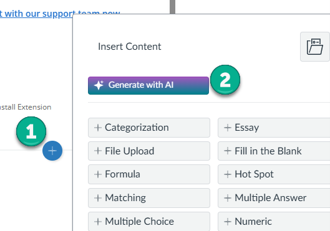
- It is located within the Build interface; click on the Plus icon [1] to add a new question to the New Quiz and select “Generate with AI” [2]
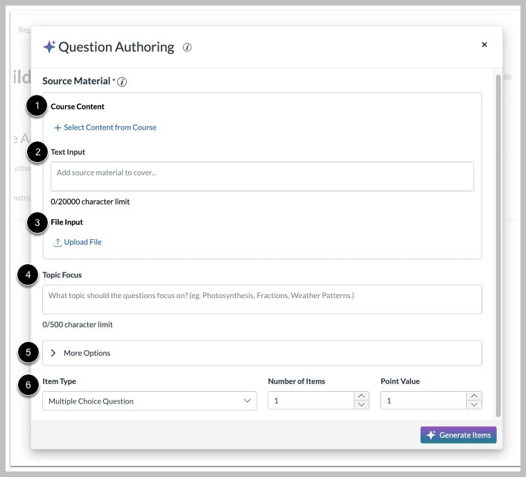
- You can generate questions by choosing existing course content [1], entering text [2], or uploading files [3]. You can also add a topic focus [4] and select relevant learning outcomes, depth of knowledge, or language [5] before choosing the question type [6].
Resources & Nutrition Fact Sheet
- Nutrition Fact Sheet – IgniteAI Question Authoring Tool
- How do I use IgniteAI Question Authoring for Quizzes?
Microsoft Copilot Teaching Tools in Canvas
Microsoft has introduced Copilot Teaching Tools for the Microsoft 365 LTI integration in Canvas. These AI-powered tools are available directly within familiar Canvas workflows and are designed to help instructors create, revise, and enhance course content more efficiently.
Because the tools are built into the Microsoft Education integration, instructors can make changes to Assignments, Pages, and other student-facing content without leaving Canvas.
Who Can Use It?
The preview is available to Canvas course instructors, TAs, designers, and admins with instructor-level permissions in a course.
The feature is included with standard Microsoft 365 Academic Faculty licenses and does not require a separate paid Microsoft 365 Copilot license.
What Can Copilot Teaching Tools Do?
Copilot can help instructors quickly update existing course materials without starting from scratch. You can use it to:
- Adjust the reading level, length, or difficulty of content.
- Differentiate instructions for different groups of learners.
- Create interactive study activities such as flashcards, matching activities, and fill-in-the-blank exercises.
These activities can be shared with students as optional practice and review materials.
How to Access the Tools in Canvas
Instructors can launch Microsoft Copilot Teaching Tools from several common Canvas locations:
-
The Apps (plug) menu in the Rich Content Editor
-
The More (…) menu when creating an assignment
-
The More (…) menu when adding items to a module
-
The + Add Item option in a module by selecting External Tool and choosing Microsoft Education
Getting Started
If you already have the Microsoft 365 LTI enabled in your Canvas course, simply open the Microsoft Education tool from one of the locations above and look for the Copilot Teaching Tools option. From there, you can select existing content to modify or create new interactive learning activities for your students.
Turntitin Standard Assignment
The Turnitin Standard Assignment within Turnitin Feedback Studio has been updated. Faculty can use it to choose the correct assignment type, add required assignment details, review optional settings, and copy an existing assignment when available.
The Turnitin Standard Assignment is availabie on the Canvas Assignments Index Page. Pleasee note that the classic way of adding Turnitin to an Assignment within a Canvas Assignment's settings is still available.
Access the Standard Assignment
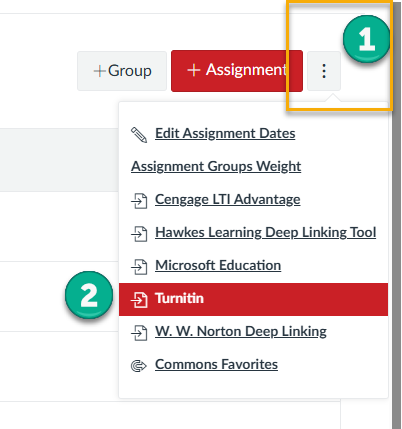
To access the Standard Assignment, click on Assignments in the course navigation menu. Then, click on the three vertical dots [1] in the top right-hand corner of the page and select Turnitin [2].
Tutorials & Resources
Turnitin Multipart Assignments
Turnitin's new Multipart Assignments feature gives instructors a way to organize assignments that are completed in multiple stages. Rather than creating completely separate Turnitin assignments for each step of a writing project, instructors can connect related assignment parts into one workflow.
This can be especially useful for scaffolded writing assignments where students submit a proposal, draft, revision, and final paper as part of the same project.
How to Use It
Multipart Assignments can be used to connect up to eight Standard and/or Clarity assignments. Instructors can use the individual parts to break a larger assignment into manageable steps and provide feedback along the way.
A multipart assignment might look something like:
Research Proposal → First Draft → Revision → Final Paper
The individual parts can be set up to match the way you already structure your assignments in Turnitin. Students can then work through the different stages of the project while using feedback from earlier submissions to inform their later work.
Key Notes of Interest
- Up to eight assignments can be connected within a multipart assignment.
- Multipart Assignments support both Standard and Clarity assignments.
- The feature is designed with scaffolded and process-based writing in mind.
- Instructors can use multiple stages to provide feedback throughout the writing process rather than waiting until the final submission.
- The feature can be useful for research papers, essays, projects, and other assignments that involve drafting and revision.
- Turnitin has also updated some assignment terminology. Student Writing is now Clarity, and New Standard is now Standard. The previous Standard assignment type is now identified as Standard (Classic).
Things to Know
Think about the assignment as a process. Multipart Assignments are most useful when students are completing related pieces of work that build toward a larger final product.
Plan your stages before creating the assignments. Consider what students will submit at each stage and where feedback will be most useful.
You don't have to change the way you structure every assignment. Multipart Assignments are an option for projects that naturally lend themselves to multiple stages. A traditional single assignment may still be the better choice for a one-time submission.
Use feedback intentionally. The biggest benefit of a multipart workflow is the opportunity for students to use feedback from one stage as they move into the next.