

Converting Classic Quizzes to New Quizzes
Classic to New: Converting Your Quizzes
In the section below, you will review the following information:
- How you created your Classic Quizzes - did you use Question Banks?
- Determining how you built your Classic Quizzes, and what it means
- Migrate: Creating a New Quiz copy of a Classic Quiz in the same course
- The "Migrate" tool will no longer be available after the Fall 2026 term concludes.
- Copy to: Copying one New Quiz from one course to another
- Use the "Copy to" feature only after you have used the "Migrate" feature to convert your Classic Quiz into a New Quiz.
- Using "Copy to" after the Fall 2026 term from previous archived courses is not advised.
- Course Import/Course Copy - All content: Importing a complete Canvas course into another Canvas course shell.
- This operation will continue to be available after the Fall 2026 term concludes.
- Course Import/Course Copy - Select specific content: Selecting only the Classic Quizzes and Question Banks for import into another Canvas course shell.
- This operation will continue to be available after the Fall 2026 term concludes.
- Decision Matrix: to help you decide which option is best for your situation
- Unsure of Your Next Step? Request a Course Copy from Online@JSU.
- Additional Resources
Why Understanding How You Added the Question Banks is Important
During a Migration [3], all Question Banks within the Classic Quiz are converted into Item Banks. Completing a course copy of the entire course [5] also achieves this objective. Using the Copy to feature [4] after migrating a Classic Quiz to a New Quiz will copy the Item Banks into the new Course.
However, if Course Import/Course Copy - Select specific content [6] is used to migrate your Classic Quizzes and Question Banks, any Question Banks not selected for import will be excluded and will be absent from the New Quiz created in your course.
Basics of Classic Quiz Construction
Did you use Question Banks to create your Classic Quiz?
If so, how you added the Question Banks determines how Classic Quizzes are migrated/converted to New Quizzes.
In Classic Quizzes, questions can be added in three ways:
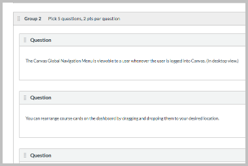
- + New Question = typing a question directly into the quiz
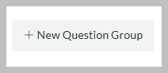
- + New Question Group = Connecting a Question Bank to a quiz
- Find Questions = Finding and Embedding a Question Bank into a quiz
This is an important distinction if you choose to perform a course content import and elect to “Select specific content” instead of “All content.”
- Questions created directly within the Classic Quiz will migrate when migration to New Quiz occurs.
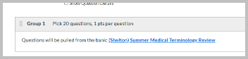
- Question Banks added to a Classic Quiz using “+New Question Group” will not migrate unless the Question Bank is also copied/imported.
- Question Banks added to a Classic Quiz using “Find Questions” will migrate when migration to New Quiz occurs.
This is an important distinction if you choose to perform a course content import and elect to “Select specific content” instead of “All content.”
|
|
+ New Question |
+ New Question Group |
Find Questions |
|
Adding the Questions |
Creating a question directly into the Classic Quiz |
Finding and Connecting a Question Bank to a Classic Quiz |
Finding and embedding a Question Bank directly into a Classic Quiz |
|
Home: Where do the questions live?
|
Directly in the Classic Quiz |
In the Question Bank |
Directly in the Classic Quiz |
|
What happens during migration? |
All questions are migrated and live in the New Quiz. |
Questions are not migrated into the New Quiz unless the Question Banks are also migrated/copied. |
Questions are migrated/copied into the New Quiz. |
Before Migration -> Check How You Built Your Classic Quiz
Determining how you added Question Banks to your Classic Quiz will inform how you decided to migrate/convert your Classic Quizzes and Question Banks.
- If you attempt a course import (a course copy) from one course to another and decide to "Select specific content" instead of completing an entire course import, the Classic Quizzes and the Question Banks must be selected.
- If Question Banks are not selected, any Question Banks added to the Classic Quiz using +New Question Group will not be imported into the course.
Go into the settings of each Classic Quiz and determine how you added your Question Banks to the quiz.
Using + New Question Group
Button in Canvas
How Question Bank is Displayed in the Classic Quiz
Using Find Questions
Button in Canvas

How Question Bank is Displayed in the Classic Quiz
Converting a Classic Quiz to a New Quiz in the Same Course
Note: The "Migrate" feature will no longer be available after the Fall 2026 term concludes.
In Canvas, a Classic Quiz can be converted to a New Quiz within the same course using the “Migrate” feature.
- What “Migrate” does: Converts Classic Quiz to New Quiz in the same course
- What “Migrate” does not do: Does not copy or import the newly converted New Quiz into a new course
When the Classic Quiz has been migrated to a New Quiz, you will receive an email in your GEM email account that the course export is finished. This is misleading; the email signifies that your Classic Quiz has completed the migration to New Quiz in your course. You now have two copies of the quiz in your course: a Classic Quiz copy and a New Quiz copy.
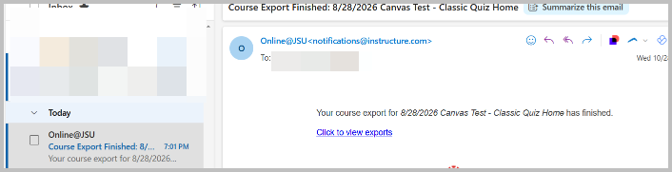
If you use the “migrate” feature you will still have to copy/import the New Quiz into a new course.
- Question Banks added to the quiz using +New Question Group and Find Questions will both be included in the migrated New Quiz.
Migrating a Classic Quiz
To “migrate” a Classic Quiz to a New Quiz, go to the Quizzes Page in your course.
- Locate the quiz and click on the three vertical dots.
- Click on “Migrate.”

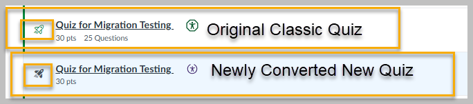
The newly converted New Quiz will appear directly under the original Classic Quiz once migration is complete.
Notice the difference between the icons:
- Classic Quiz Icon – rocket ship outlined
- New Quiz Icon – rocket shop filled in
Using "Copy to" to Export, or Copy, a New Quiz into a New Course Shell
Use the "Copy to" feature only after you have used the "Migrate" feature to convert your Classic Quiz into a New Quiz.
Note: Using the Copy to feature within archived courses after the Fall 2026 term is not advised. Classic Quizzes in archived courses cannot be migrated using the Migrate feature, and using Copy to will copy a Classic Quiz to a different course but will not be converted to a New Quiz.
Using Copy to
- Click on Quizzes in the course navigation menu.
- Locate the New Quiz copy of your quiz.
- Click on the three vertical dots [1] and select Copy to…[2].
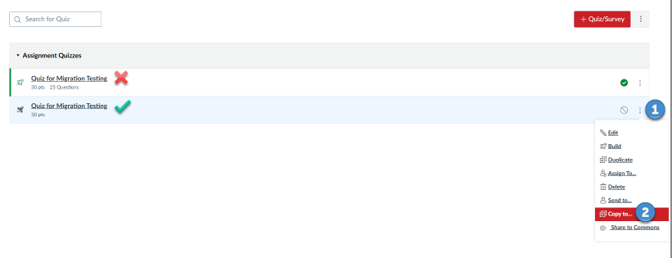
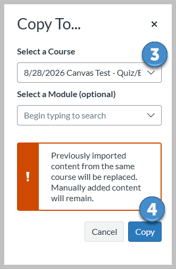
- Find your course in the Select a Course box [3] and select the Copy button [4].
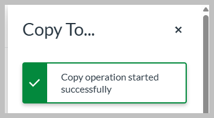
- A message appears immediately: Copy operation started successfully.
- Go to the course you are copying the New Quiz to and wait. Give the New Quiz some time to finish migrating. Even after you see the New Quiz appear, wait before you open it. Opening the New Quiz before the attached Item Banks finish importing into the course could disrupt the process. Waiting 5 minutes before opening the New Quiz is good practice.
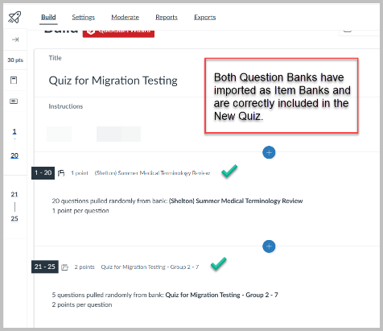
- After waiting, open the New Quiz to ensure that the Item Banks are also imported. Click on the three vertical dots [1] next to the New Quiz title and select Build [2].

- In this example, both Question Banks have been successfully imported as Item Banks and are correctly embedded in the New Quiz.
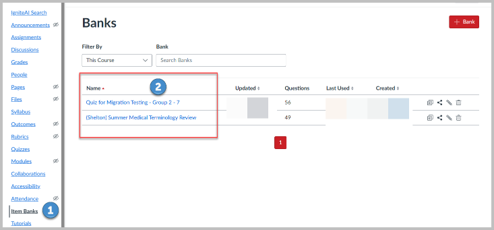
- Now, go to the Item Banks page and check to make sure your Item Banks appear. In the course navigation menu, click on Item Banks [1]. You should see the Item Banks in list form [2].
Using Import Course Content - All content to Migrate Classic Quizzes and Question Banks
As a Reminder:
- Classic Quiz > New Quiz
- Question Banks > Item Banks
Complete a 100% Course Import by selecting “All content”
- This process imports all content from one course into another, including Classic Quizzes and Question Banks. During the import, Classic Quizzes are converted to New Quizzes and Question Banks are converted to Item Banks.
Use this option if you want to import your entire course into a new course shell.
Using Course Import Content > All content
- In your course, click on Settings in the course navigation menu.
- Click on Import Course Content.
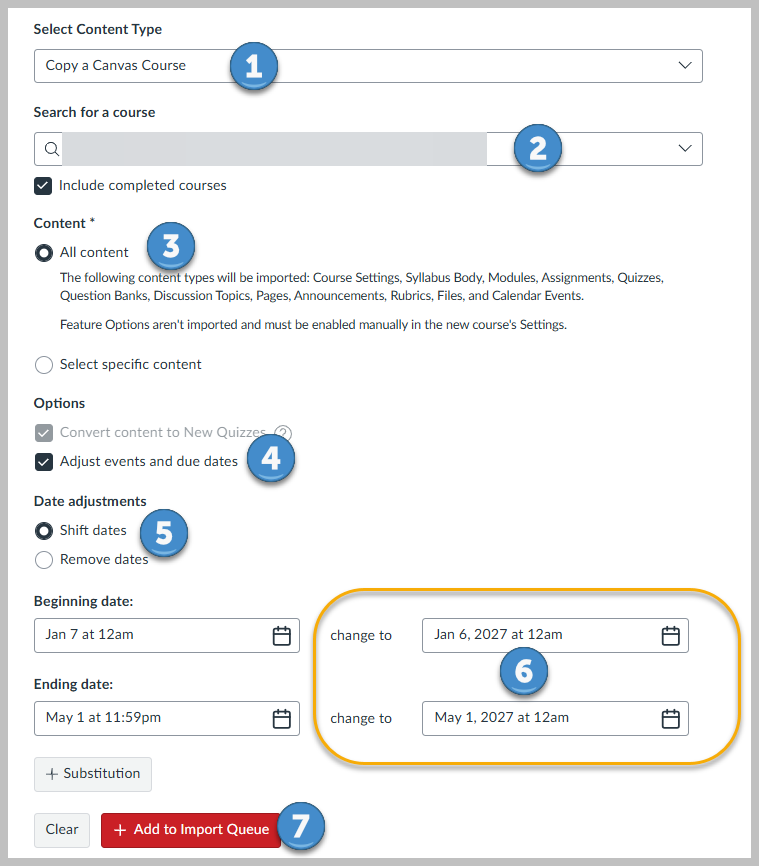
- Under Select Content Type, select Copy a Canvas Course [1].
- In the Search for a course box [2], find the course you want to import.
- Select All content [3].
- If you have an Automatic Missing Policy in your course, you also need to adjust the due dates. To do so, click Adjust events and due dates [4], Shift dates [5], then adjust the destination course's due dates [6] to future dates that match the destination course's term dates. Doing so will prevent students from seeing zeros on their assignments at the start of the term.
- Select the +Add to Import Queue button [7].
- The course import process will begin, and eventually the process will be completed.
- All content will be imported into your course.
- If you have an Automatic Missing Policy enabled in your gradebook and you forget to adjust the due dates, clicking on +Add to Import Queue will generate a warning popup box that says, "You're importing from a course with Automatic Missing Policy enabled. This policy and its settings will be copied to your course. If any imported assignments have past due dates, they may receive automatic zeros. To avoid this, you can cancel and adjust due dates, or choose not to import the missing policy from the course course."
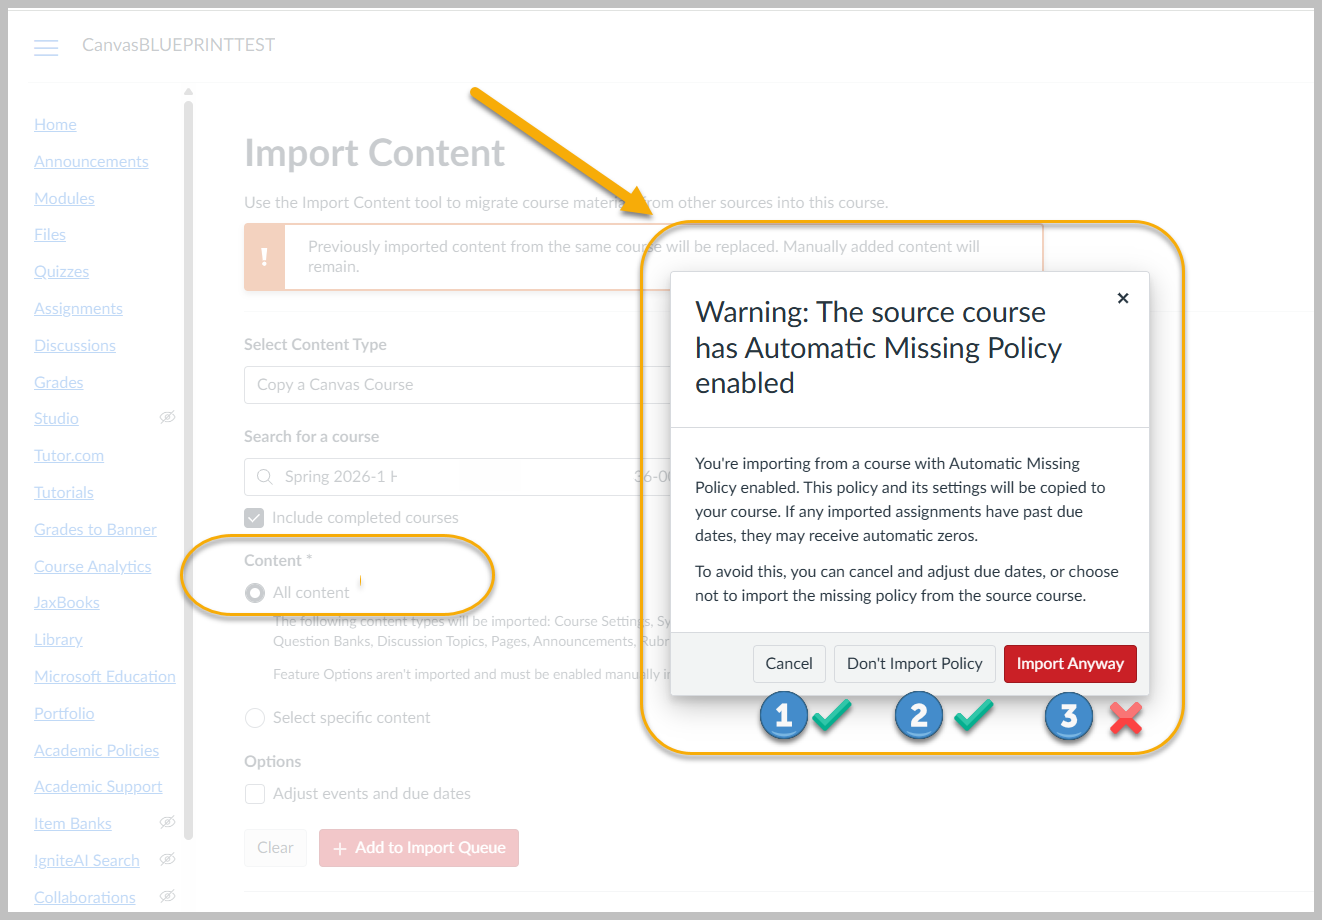
- Do not select Import Anyway [3]. Selecting Import Anyway will import the missing policy into destination course's gradebook, and students in the destination course will receive zeros on all assignments at the start of the term. This will cause students to worry about their grade, and you will be inundated with student emails about their grades. Instead, you have two options:
- Option 1: Select Cancel [1] and adjust the due dates to future due dates. Selecting Cancel will take you back to the import screen where you can choose to adjust due dates.
- After Selecting Cancel [1], select Adust events and due dates [4] and Shift dates [5]. Change the dates to future dates so that students will not receive zeros before the class starts [6]. Click on +Add to Import Queue [7]. Then, you can click on the Select content button.
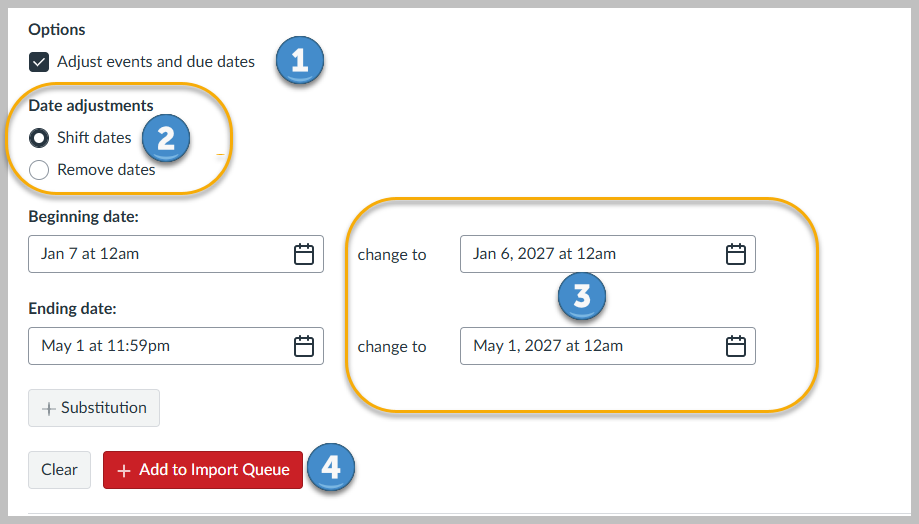
- After completing the import, you will need to adjust the due dates in the destination course because the due date adjustment during the course import is not a one-to-one date match.
- Option 2: Select Don't Import Policy [2]. After importing your course:
- First, update the due dates in the destination course.
- Second, update the Automatic Missing Policy in the gradebook only after updating the due dates.
- Option 1: Select Cancel [1] and adjust the due dates to future due dates. Selecting Cancel will take you back to the import screen where you can choose to adjust due dates.
IMPORTANT: After the course has been imported, give the New Quizzes and Item Banks time to import into the course. There will be a time lag between the time when the course copy completes and when all Item Banks import into the course. Opening a New Quiz before the Item Banks import could disrupt the import process and break the connection between the Item Bank(s) and the New Quizzes. A safe practice to follow is to complete the course import and then work on something else for at least 30 minutes. Then, you can start checking your New Quizzes to make sure they are all imported correctly.
Before you publish your quiz….
- After the import process is complete and you have waited at least 30 minutes, go to the Quizzes Page and open each New Quiz and make sure that ALL questions are imported.
- Then, click on Item Banks in your course navigation menu and make sure that all your Question Banks have been imported as Item Banks. If you do not see the Item Banks immediately, do not panic. It may take some time for them to appear.
Using Import Course Content - Select specific content to Migrate Classic Quizzes and Question Banks
As a Reminder:
- Classic Quiz > New Quiz
- Question Banks > Item Banks
Import only the Classic Quizzes and Question Banks you want to import by selecting “Select specific content.”
- This process imports only the Classic Quizzes and Question Banks you select. During the import, Classic Quizzes are converted into New Quizzes and Question Banks are converted into Item Banks.
Use this option if you only want to import Classic Quizzes as New Quizzes, and Question Banks as Item Banks and you do not want to import any other content into the new course.
Using Course Import Content > Select specific content
- In your course, click on Settings in the course navigation menu.
- Click on Import Course Content.
- Under Select Content Type, select Copy a Canvas Course [1].
- Under Search for a course [2], find the course you want to import.
- Choose Select specific content [3].
- If you have an Automatic Missing Policy in your course, you also need to adjust the due dates. To do so, click Adjust events and due dates [4], Shift dates [5], then adjust the destination course's due dates [6] to future dates that match the destination course's term dates. Doing so will prevent students from seeing zeros on their assignments at the start of the term.
- Select the +Add to Import Queue button [7].
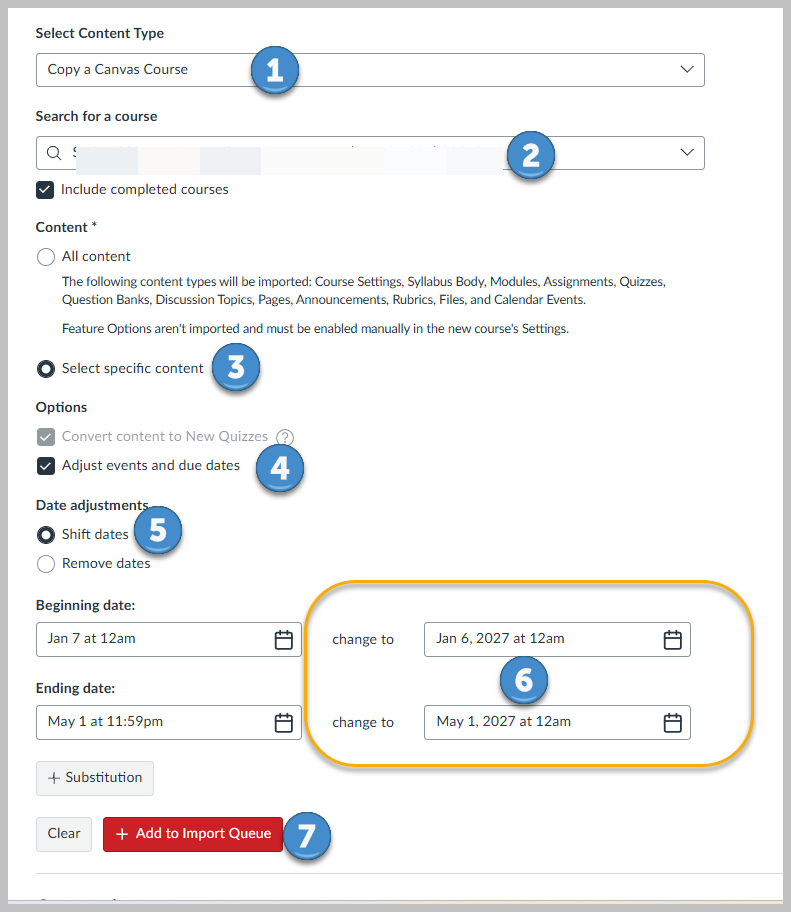
- If you adjusted the due dates, clicking on the +Add to Import Queue button [7] will import the course into the queue and you can click on the Select content button to select the content you want to import.

- If you forgot to adjust the due dates and you have an Automatic Missing Policy enabled in your gradebook, clicking on +Add to Import Queue will generate a warning popup box that says, "You're importing from a course with Automatic Missing Policy enabled. This policy and its settings will be copied to your course. If any imported assignments have past due dates, they may receive automatic zeros. To avoid this, you can cancel and adjust due dates, or choose not to import the missing policy from the course course."
- Do not select Import Anyway [3]. Selecting Import Anyway will import the missing policy into destination course's gradebook, and students in the destination course will receive zeros on all assignments at the start of the term. This will cause students to worry about their grade, and you will be inundated with student emails about their grades. Instead, you have two options:
- Option 1: Select Cancel [1] and adjust the due dates to future due dates. Selecting Cancel will take you back to the import screen where you can choose to adjust due dates.
- After Selecting Cancel [1], select Adust events and due dates [4] and Shift dates [5]. Change the dates to future dates so that students will not receive zeros before the class starts [6]. Click on +Add to Import Queue [7]. Then, you can click on the Select content button.
- After completing the import, you will need to adjust the due dates in the destination course because the due date adjustment during the course import is not a one-to-one date match.
- Option 2: Select Don't Import Policy [2]. After importing your course:
- First, update the due dates in the destination course.
- Second, update the Automatic Missing Policy in the gradebook only after updating the due dates.
- Option 1: Select Cancel [1] and adjust the due dates to future due dates. Selecting Cancel will take you back to the import screen where you can choose to adjust due dates.
- Once you have decided how to address the Automatic Policy and have clicked on Select content, you can import ALL Classic Quizzes and Question Banks: To import all Classic Quizzes as New Quizzes and ALL Question Banks as Item Banks, check the checkbox next to Quizzes [1] and the checkbox next to Question Banks [2]. Then, select the Select Content button [3]. All Classic Quizzes will be imported and converted into New Quizzes and all Question Banks will be imported and converted into Item Banks. Note: Selecting the checkbox next to Quizzes will automatically check the Assignments checkbox, indicating that only the Quizzes within the Assignments Page will be imported.
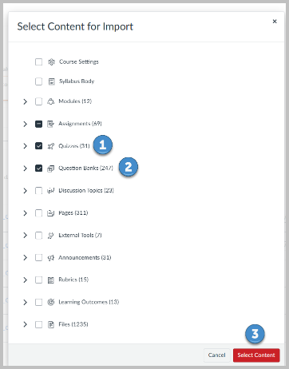
- However, you can also import specific Classic Quizzes and specific Question Banks: If you want to import only specific, identified Classic Quizzes and Question Banks, follow these steps:
- Click on the arrow next to Quizzes [1].
- Select the Classic Quiz you want to import [2].
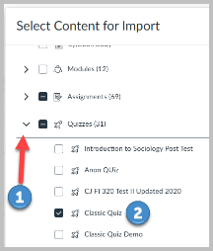
- Click on the arrow next to Question Banks [3].
- Select the Question Bank associated with the Classic Quiz you previously selected [4].
- Click on the Select Content button [5].
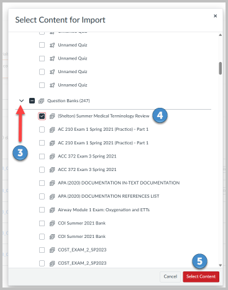
- The Classic Quiz will be imported and converted into a New Quiz, and the Question Bank will be imported and converted into an Item Bank. The Item Bank will be attached to the New Quiz, and it will also appear on the Item Banks Page.
IMPORTANT: After the course has been imported, give the New Quizzes and Item Banks time to import into the course. There will be a time lag between the time when the course copy completes and when all Item Banks import into the course. Opening a New Quiz before the Item Banks import could disrupt the import process and break the connection between the Item Bank(s) and the New Quizzes. A safe practice to follow is to complete the course import and then work on something else for at least 30 minutes. Then, you can start checking your New Quizzes to make sure they are all imported correctly.
Before you publish your quiz….
- After the process is complete and you have waited at least 30 minutes, go to the Quizzes Page and open each New Quiz and make sure that ALL questions are imported.
- Then, click on Item Banks in your course navigation menu and make sure that all your Question Banks have been imported as Item Banks. If you do not see the Item Banks immediately, do not panic. It may take some time for them to appear.
Use this decision matrix to help you decide how you want to proceed with migrating your Classic Quizzes to New Quizzes and Question Banks to Item Banks.
|
Feature |
Action |
When to Use |
Question Bank Status |
|
Migrate (Not available after Fall 2026 term0 |
Create a copy of one Classic Quiz as a New Quiz copy in the same course |
To create a New Quiz version of one Classic Quiz in your course. |
Questions added to a Classic Quiz using +New Question Group and Find Questions are converted into Item Banks and are included in the New Quiz. New Item Banks also appear on the Item Banks Page in the course. |
|
Copy to (Not advised after Fall 2026 term) |
Copy one New Quiz from one course to another |
To copy one New Quiz to another course. |
Questions added to a Classic Quiz using +New Question Group and Find Questions are imported as Item Banks and are included in the New Quiz. New Item Banks also appear on the Item Banks Page in the course. |
|
Import Course Content > All Content (Available after Fall 2026 term) |
Import an entire Canvas course into another Canvas course shell |
To import all Classic Quizzes and Question Banks, along with all other course content, into another course shell. Classic Quizzes convert to New Quizzes and Question Banks convert to New Quizzes during the import process. |
Questions added to a Classic Quiz using +New Question Group and Find Questions are imported as Item Banks and are included in the New Quiz. New Item Banks also appear on the Item Banks Page in the course. |
|
Import Course Content > Select specific content (Available after Fall 2026 term) |
Import selected Classic Quizzes and Question Banks into a Canvas course shell |
To import a selection of Classic Quizzes and Question Banks into another course shell. Classic Quizzes convert to New Quizzes and Question Banks convert to New Quizzes during the import process. |
Questions added to a Classic Quiz using Find Questions are imported as Item Banks and are included in the New Quiz. Questions added using +New Question Group are imported as Item Banks if the question banks are also selected during the course import using “Select specific content.” New Item Banks also appear on the Item Banks Page in the course. |
|
Request a Course Copy from Online@JSU |
To request that Online@JSU copy your course content, including Classic Quizzes and Question Banks, into a course so that you can have peace of mind regarding the -preservation of your quizzes and question banks. |
Classic Quizzes will be imported and converted to New Quizzes. All Question Banks will be imported and converted into Item Banks. All quizzes will be 100% intact. Other course content can also be imported upon request, including a complete course copy. |
Before Reviewing the Tutorial
Online@JSU recognizes that faculty take great care in creating quiz questions and building effective, authentic, rigorous quizzes, tests, and exams, and the importance in preserving them during the migration from Classic Quizzes to New Quizzes and Question Banks to Item Banks. Online@JSU also understands that this process may seem stressful or even confusing. Therefore, consider requesting a course copy from Online@JSU.
Request a Course Copy and Gain Peace of Mind
By requesting a course copy from Online@JSU, we will complete the course copy process for you so that you can have peace of mind, and in the process all of your Classic Quizzes will convert to New Quizzes and all of your Question Banks will convert to Item Banks. You can request a complete course copy, or only parts of your course.